Link Management
Link Setup
Maximus uses a proprietary tracking system to generate links for the networks to use directly. On each click, users are redirected to Maximus before being redirected to the set presell for the campaign.
This technology allows for multiple options:
- Some native networks have problems crawling redirected links. Maximus can send crawlers directly to a presell instead of having problems with discovery or categorization.
- If a link goes down or a domain name changes, links can be edited and updated without going through a lengthy approval process.
- Test multiple presells through other systems to optimize the full funnel.
When completing link setup, you can set specific macros from the individual networks to pass dynamically to external tracking systems.
Macro Tokens
All Networks
- {clickid} - Maximus click id that needs passed back in Maximus pixels
- {ref} - a URL encoded version of the referring site (when available)
- {image} - the image id from Maximus
- {network} - the network abbreviation from Maximus
- {mlid} - The Maximus link id, required for Cookieless Advanced Tracking
Example:
http://preselllink.com/landingpage.html?aff_sub5={clickid}Outbrain
- {campaignid} - the campaign ID from the network
- {network_click_id} - the Outbrain click ID
- {site} - the site name from the network
- {adid} - the ad id/item id from the network
- {title} - the ad title from the network
Example:
http://preselllink.com/landingpage.html?aff_sub5={clickid}&utm_content={title}&utm_term={site}Taboola
- {campaignid} - the campaign ID from the network
- {network_click_id} - the Taboola click ID
- {site} - the site name from the network
- {adid} - The ad id/item id from the network
- {title} - The ad title from the network
- {platform} - Mobile or Desktop
- {tn} - The thumbnail from Taboola
Example:
http://preselllink.com/landingpage.html?aff_sub5={clickid}&camp_id={campaignid}&source={platform}Gemini
- {campaignid} - the campaign ID from the network
- {site} - the site name from the network
- {g_device} - the device generating the click
- {g_ad_group_id} - Ad group ID from Gemini
- {g_supply_name} - the domain name from Gemini
- {g_ad_id} - the Gemini ad ID
Example:
http://preselllink.com/landingpage.html?aff_sub5={clickid}&device={g_device}&adid={g_ad_id}RevContent
- {network_click_id} - the RevContent click ID
- {widget_id} - RevContent widget id
- {content_id} - RevContent content id
- {boost_id} - RevContent boost id
- {adv_targets} - RevContent Advertiser Targets
Example:
http://preselllink.com/landingpage.html?aff_sub5={clickid}&widget={widget_id}&campid={boost_id}Content.Ad
- {campaignid} - the campaign ID from the network
- {network_click_id} - the Content.Ad click ID
Example:
http://preselllink.com/landingpage.html?aff_sub5={clickid}&camp_id={campaignid}Example
An example presell link looks like so:
http://example.com/?site={site}&title={title}The resulting link on click:
http://example.com/?site=MSN-MSN-HOME&title=This_is_Ad_text
Using Links
During the Add Campaign process, as well as on the Edit Link section of the Campaign Details page for a campaign, you can use two different types of links: a Review Page Link and Presell Links.

Review Page
A Review Page is where you would like bot and crawler traffic to be sent - a safe page that will not affect your click data since it is directed to this page. If you do not have a safe page you can use the same URL as your Presell Link.
Presell Links
Presell Links are where you would like your legitimate traffic to go to. These are offer or presell pages at the top of the sales funnel. You can use one presell link, or more than one if you're interested in A/B split testing your presells to find a favorable one. You can also rotate between multiple presell links for either testing purposes or to vary which presells traffic see.
Using Multiple Presell Links
If you decide to use more than one presell link, you can add more by clicking the + add button. To remove a presell link you can click on the delete icon to the right of the link. You are not required to delete links, and if you'd like to remove them from receiving any traffic.
Weights
Using weights allows you to decide the amount of traffic that you'd like a link to receive. Presell link rotation factors in each weight as a proportion to the total. Links with a higher weight will be accessed more in comparison to links with a lower weight. If there are 3 links with weights of 50, 25, and 25, the link with the with the weight of 50 will receive half of the traffic as the weight is half the total - those other links will each receive 25% or 1/4 of traffic.
Split Testing
To split test between two different presell links, you have two scenarios in which to do so.
New or Cloned Campaign
On a new or cloned (new) campaign, create two presell links and give them an equal weight, to simplify things set both weights to 50.
It is highly recommended to split test on new campaigns so you can compare them from the start.
On an Existing Campaign
If you have a campaign with only one presell link, it is possible to add a second link in the Edit Link drawer on the menu of the Campaign Details page.
To gather the appropriate amount of traffic to make a decision quickly, set the new link to a higher weight - such as 80, and set the first link to 20 so that more traffic is flowing to the newer LP.
You can also test out a new link on an existing campaign using the Test New Link feature below.
Routing
In Maximus, you can set up routes for your campaigns to have traffic go to a specific presell link that you find has the best performance. There's two types of routing that can be set up for a campaign found on the following reports.
Click on the report name to learn more about this report and how you can use it to route traffic:
- By Presell Sites - Sending traffic from a site to a specific presell
- Image/Site/Presell - Sending traffic when an image appears on a site to a specific presell
- Image/Widget/Presell - Sending traffic when an image appears on a site to a specific presell
When using routing, Maximus uses the following priority to determine where to send traffic to:
- Does a route exist for Image + Site?
- If so, the system uses that link.
- Does a route exist for the site?
- If so, the system uses that link.
- Do multiple presell links exist for the campaign?
- If so, weigh it according to the setup.
- If not, use the single presell link.
Routing to Multiple Presells
When you use any routing, you can select one or more presells to route traffic to. If you select more than one presell, Maximus will evenly distribute traffic across all of the presells that you've added routing for.
You can add or remove routes by clicking on the icon next to the presell in the respective reports.
Advanced Tracking
Advanced Tracking in Maximus lets you track the visits to your landing page, the clicks on your landing page to your offer, and the Landing Page CTR % of those clicks (Clicks / Visits). This also allows you to rotate links on your landing page if you're running similar offers.
Check out our documentation and video for Advanced Tracking to learn more about enabling this on your campaigns, and how to set it up.
Automatic Routing
If you enable Advanced Tracking, you also have an additional setting that lets Maximus handle routing for you on the Image+Site level based on your Presell CVR and CTR %. You can edit the settings to decide how you want Maximus to select the best presell for your traffic from an image+site combination to better optimize automatic routing.
To learn more about Automatic Routing, click here.
Link Testing
If you're running a campaign that has routing set up, adding new links to test out can be cumbersome when there's a lock on the By Presell Sites or Image/Site/Presell reports that tell traffic to go to a specific presell. You can use Link Testing to see how a new presell link performs without having to update all of your current routing to make sure that new link gets traffic!
If your campaign already has many presell links regardless of routing, you can also test out a new link without worrying about modifying the existing weights to ensure the new link gets traffic.
When testing out links, you can test more than one at a time - Maximus will split the traffic between links as evenly as possible between them. You can also even choose to test out new links and already existing links on the campaign to see how they do in a split test.
You can perform a link test on new links, or existing links!
Setting up a Link Test
There's 2 ways you can test out links -
New Links
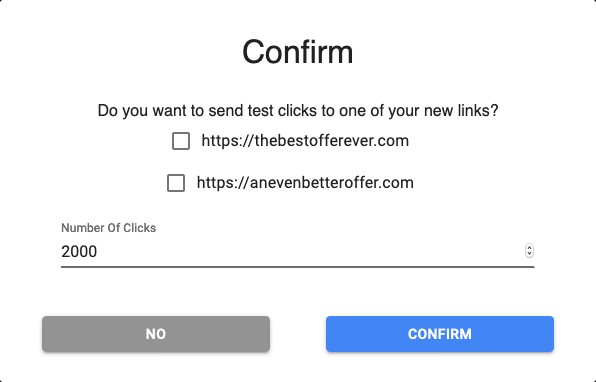
When you add new presell links, you'll see the following pop up after you submit changes in the Edit Link drawer. The new pop up asks if you want to send test clicks to one of the links you've added. In the dropdown you'll be able to mark the checkbox next to links you have added, and then the number of clicks you want to use for the test:

You can select any of the presell links that exist on the campaign including both new and old links. Just select the checkbox next to each link you want to test out!
Existing Links
If you want to try testing out how your existing presell links perform, you can select Start Link Test on the right hand menu on the Campaign Details page.
Here, select the links you want to test against each other. You can use this type of link testing to see how your presell links work with even routing - ignoring and site, image and site/widget routing, and weighted routing.
When you select more than one link, Maximus will do its best to route traffic evenly between the links you've added to allow you to get a better picture of split testing new links on your campaign. The number of clicks for the test is for all clicks from the links combined and not for individual links.
Click Testing Phase
Once a test begins, you'll see a banner at the top of the campaign letting you know that there is a test active on the campaign.

Maximus will check every 5 minutes to see whether the number of clicks have been reached. While links are being tested, all traffic will go to those links. Once a test finishes, routing will resume to the normal setup it had before the test started.
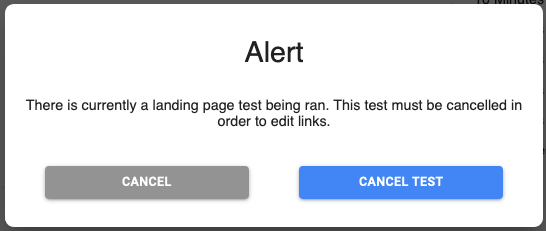
During testing if you want to change existing routes you will either have to cancel the test or wait until the test completes. A pop up will appear notifying you that you'll need to cancel the test to make any changes.

You can cancel the current test by clicking on the "Cancel Test" underlined text on the banner. This will send traffic through the normal routing and weights set up on the campaign.

Click confirm on the pop up to confirm you want to end the test.
Test Completion
Once the test completes, the banner for the test will disappear and you'll be able to see the results in reporting for By Landing, By Landing Sites, and the Image/Site/LP Reports.
You can then evaluate the performance of your link(s), and choose to update any routing for the campaign as you would normally.
