Campaign Details
Click on any campaign title in the Manage Campaigns page to open the Campaign Details page for that specific campaign. This page features quick links where users can Clone the Campaign, Edit Fire & Forget® Settings, Add Images, and much more! You can also view detailed reporting and charts of the campaign's performance.
Click the three line icon on the left-hand side of the bar to open or hide the menu. This menu displays campaign status and links to add to or edit campaign information.

Editing Campaign CPC and Daily Budget
The CPC and Budget on the can be edited on the Campaign Details page. Click here to learn more about editing these values.
Last Updated At and Refreshing
You can view the last time the Campaign Details page was loaded in the top right above the Date filter, and if you've had it open for a while the data on this report could be outdated. Click on the Refresh icon to reload the Campaign Details page.

The Menu
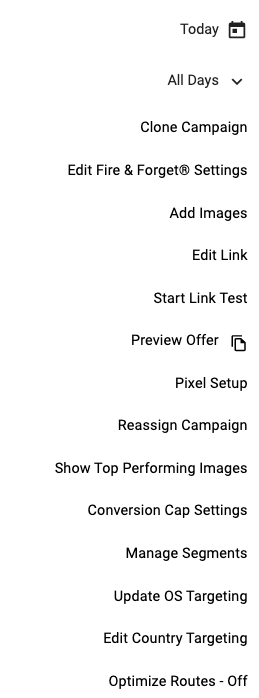
Click the calendar button to filter campaign data by date. Click here to see details about how the Date filter works.
Filter the campaign data by All Days, Weekdays Only or Weekends only. Click here to learn more about the Days filter.
Clone Campaign gives users a head start on creating a new campaign by using the ads and settings of the current campaign. Click here to learn more on campaign cloning.
Fire & Forget settings can be enabled, disabled, and edited at any time from the Campaign Details page. Click here to learn more about the Fire & Forget settings.
Add additional ads to the campaign. Click here for more information on creating new ads. Click here for more information on generating ad combinations.
Add additional carousel ads to a Gemini campaign. Click here to learn more about Carousel Ads.
Use Edit Gemini Settings to display and adjust the settings that are unique to Gemini campaigns. These settings include: age and gender targeting, base Gemini CPC, and bid adjustments for different publisher groups. Click here to learn more about Gemini Settings.
Edit presell links for the campaign. Click here for more information on link management.
Start a Link Test for existing weighted links on your campaign.Click here to learn more about link testing.
View the campaign’s landing page. Clicking the  icon will copy the link.
Reassign Campaign opens a dropdown menu that allows you to assign the campaign to a different person or group. Click here for more information on how to add sub users.
Displays a reference window with pixel information. Click here to learn more about using pixels with Maximus.
This option displays the top 3 performing images with an EPC greater than $0.30 over the past 30 days. Images will begin to appear here as long as the campaign has been active for 14 days and if images are performing at or above $0.30 EPC. This report is updated every day at midnight.
Click here to learn more about the Top Performing Images feature.
Select a number of conversions you want to limit the campaign to in a daily, weekly, or monthly time period for the conversion cap to pause a campaign. Conversion cap pauses campaigns once the conversion cap is met for the selected time period.
Add and remove Outbrain segments created via the Settings page to your campaign. Click here to learn more about Outbrain segments.
Update the OS targeting for the campaign. Click here to learn more about Outbrain OS Targeting.
Use Taboola Settings to set the Traffic Allocation, OS targeting, and Connection Type for the campaign.
A pop up will allow you to select an audience you've previously created in your Settings page, allowing you to target specific email users. Click here to read more about Gemini Audiences.
A pop up will allow you to select and update the country targeting for the campaign. Click here to read more about updating country targeting.
Automatic Routing lets you set the conditions for Maximus to automatically route traffic on the Image+Site level to the best presell. Click here to read more about Automatic Routing.
-
Green toggle indicates an active campaign
-
Gray toggle indicates an inactive campaign
-
Green toggle indicates Fire & Forget status is enabled
-
Gray toggle indicates Fire & Forget status is disabled
-
Green toggle indicates the campaign is archived
-
Gray toggle indicates the campaign is not archived
on the Archive toggle will pause the campaign, and will also turn off Fire & Forget.
Taboola campaigns are unable to pause on the network if they are in a pending status. Maximus will archive the campaign, but if a campaign is approved by the content review team at Taboola and it is past its start date, the campaign will become active and begin receiving traffic. We recommend checking on campaign statuses of campaigns which have been paused while they were pending to prevent the campaign from spending.
Reporting and Charts
At A Glance Report

The number of clicks the campaign currently has. This value only represents Maximus’s clicks. Maximus clicks are real time while reported clicks from the network are delayed. Once the day finalizes,these totals are more than likely within 10% of each other. This is because Maximus filters clicks that come from bots, test clicks, and crawlers.
The number of sales the campaign has earned.
This is the amount the campaign has spent. The spend showing for the current day are the real time estimates. The values updates to the network spends once the day is finalized. Click here to learn more about real time estimates.
The gross (total) amount of money the campaign has made.
The net amount of money the campaign has made. This value is determined by subtracting campaign spend from the revenue.
The profit margin; this value is determined by dividing profit by revenue.
This stat displays the daily budget for the campaign. Click the value to edit the daily budget.
The Budget value is independent of the time frame you are looking at, and represents the current Budget.
Displays the campaign’s current CPC. To edit this value, click on the CPC value. Please note that Gemini CPC cannot be edited. This is because CPC adjustments are made automatically when you update your Group A or Group B modifiers. Click here for more information about Gemini CPC.
The CPC value is independent of the time frame you are looking at, and represents the current CPC.
This is the earnings per click value, which is determined by dividing revenue by clicks.
The average cost per click for the campaign, which is determined by dividing spend by clicks.
CVR represents conversion rate. This is the rate of clicks that lead to a conversion. CVR is determined by dividing sales by clicks.
The average amount of time between the user clicking the ad and completing the conversion process.
You can choose to ignore the ACT spend for Slow and Stop Amount. Click here to learn more about removing ACT spend from Slow and Stop Amount.
Clicking "Show More" displays the following information for the campaign:

The date the campaign was created in Maximus.
If the campaign was added to a sub-account, it will display here. Click here to learn more about sub accounts within Maximus.
For CPC Feed campaigns, this section displays the most recent date with finalized revenue.
Charts
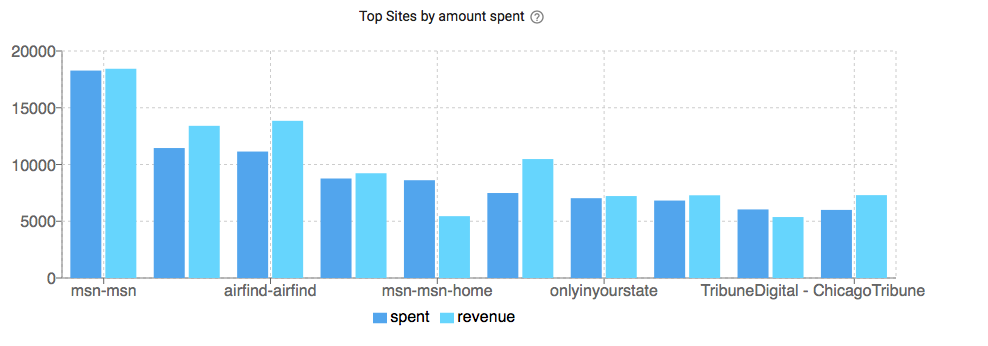
This graph displays a comparison of spends and revenue for the sites associated with the campaign. For campaigns where traffic is spread across a large number of publishers, it is possible that the top ten spends will show $0 in revenue. Click here to learn more about the Sites chart.
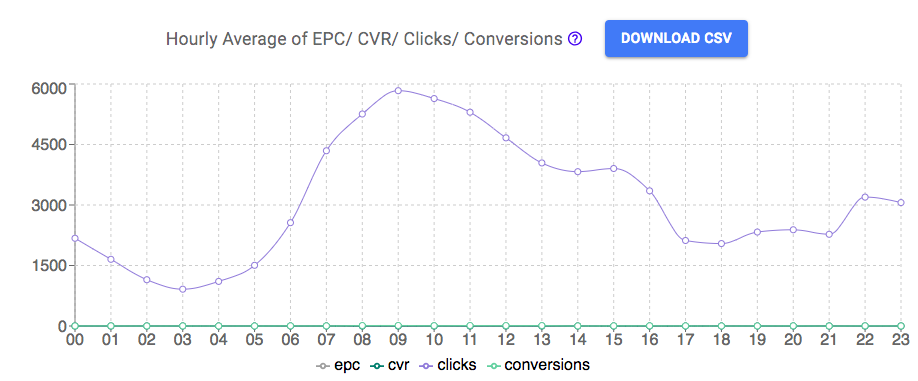
View the hourly averages of clicks and conversions with this chart. The Clicks/Conversions Chart is used well in conjunction with Day Parting - by viewing campaign performance on an average for different hours in the day, you can decide to limit CPC or pause the campaign entirely during low EPC or low click periods throughout the day. Click here to learn more about the Clicks/Conversions chart.
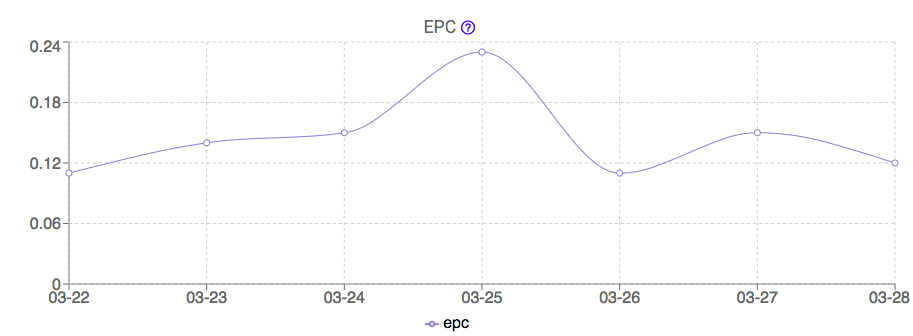
Show the EPC for the current day or for a specific time period. Click here to learn more about the EPC Chart.
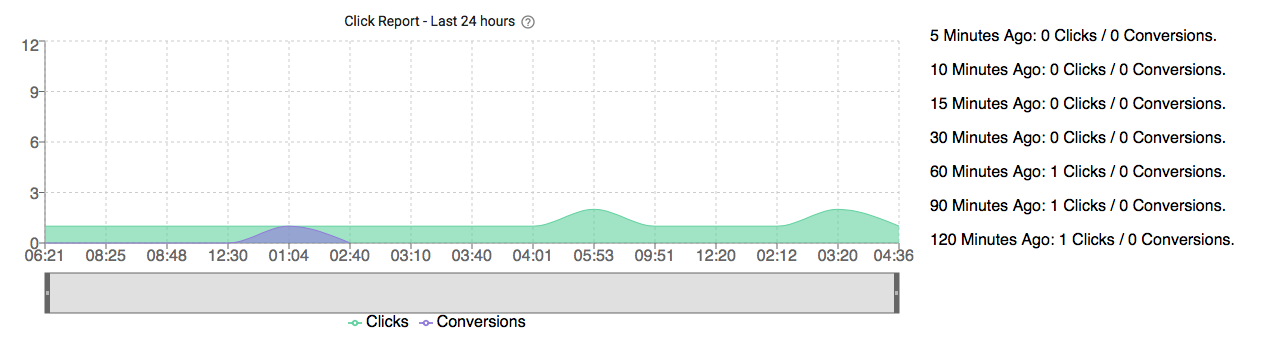
Display clicks and conversions by minute over the last 24 hours. This can also display the clicks and conversions that occurred in ranges, up to the previous 120 minutes. Click here to learn more about the Hourly Clicks chart.
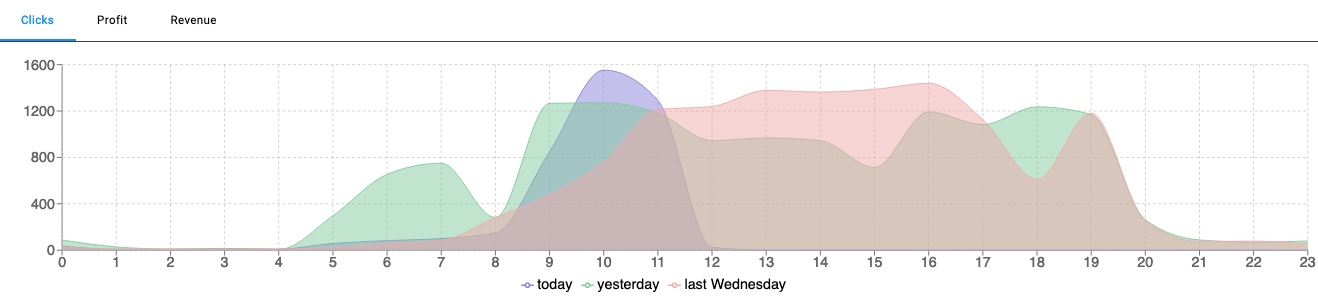
Display Today's, Yesterday's, and this day last week's data. Select whether you want to look at Clicks, Profit, or Revenue with this chart. Click here to learn more about the Hourly Comparison Chart.
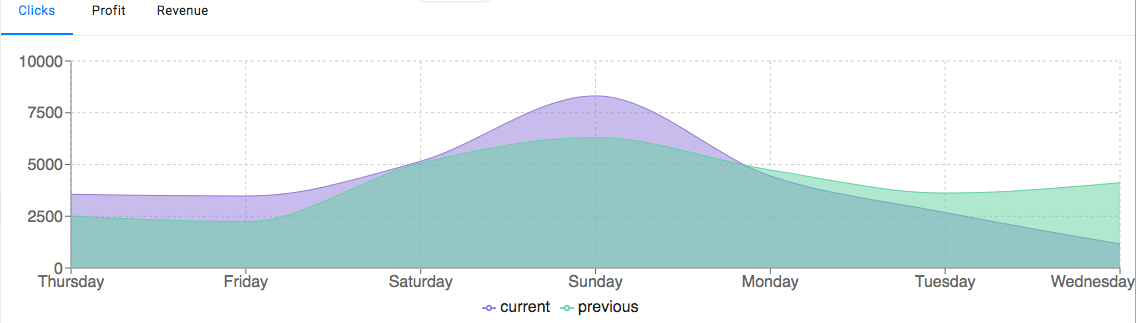
Compare the campaign data for the past week with this chart. The data can be changed to view the Clicks, Profit, or Revenue. Click here to learn more about the Weekly Comparison Chart.
Reports
Maximus features robust, real-time campaign reporting that displays stats for several different aspects of your campaigns.
To open a report, click on the name of the report from the side menu. Maximus will remember the last report viewed and display that report when accessing another campaign or refreshing the current page. Times shown are in EST.
The majority of reports on the Campaign Details page feature at the top of the report show a Last Updated time, the Latest Data that is available to use on the report, and to the left of these an icon:

You can see how long ago you loaded the report with the Last Updated time. Clicking on the icon to the left of this will refresh the report to use the Latest Data available to use with that report.
If you enable Advanced Tracking, the Clicks Report is replaced with the Visits Report and a new Clicks Report is available. There is also an additional report added called the By Landing report that displays with Advanced Tracking.
Click here to learn more about Advanced Tracking.
This report displays stats for each site.
-
Users are also able to set site bids. Click here to learn more about Site Bidding.
-
Site blocking is available for Outbrain campaigns in this tab. Click here to learn more about Site Blocking in Maximus.
-
Sites where the name is displayed as $ or “NA” comes from the network incorrectly. This is caused by tracking issues and cannot be edited.
-
Site Hourly Reporting: Site hourly reporting allows users to view the reporting for a campaign’s sites by hour and by minute. Reporting is based on estimated spend data. This data should be used for reference purposes rather than defining the value of a single click.
Click here for more information on the Sites report.
Gemini campaigns use the Gemini Sites report. This report will show the site and device data for the campaign.
This report displays data for images associated with a campaign. By default, this report displays images that have clicks within the applied date filter. Click here to learn more about the Images report.
The Image/Site/Presell Report allows you to view image performance similar to the Images Report, view how each image performs per site, see performance by presell of that image/site combination, and choose which presell you'd like that image/site combination to route to. Click here to learn more about the Image/Site/Presell report.
This report displays all of the images added to the campaign. This report also displays the Creative ID, which is a unique, automatically generated Maximus ID that Maximus uses to track images. Click here to learn more about the All Images report.
RevContent campaigns contain the Widget report. This report displays the widget performance data for a campaign. Click here to learn more about using widgets in Maximus.
Displays the number of conversions recorded for a campaign. Click here to learn more about the Conversions report.
This table displays the 150 most recent clicks tracked by Maximus. Click here to learn more about the Clicks report.
Campaign Hourly Reporting gives users the ability to view reporting data for the campaign broken down on a per-hour and per-minute basis. This reporting is based on estimated spend data. Our users commonly use the hourly report to view estimated spend and revenue by hour for a specific date. For more information on the By Hour report, click here.
Displays campaign-level presell data. Click here to learn more about the By Presell report.
Displays presell data for a campaign by the sites where the clicks originated. Within the By Presell Sites report, uses can also set and adjust site routing. To learn more about the By Presell Sites and site routing, click here.
Displays the data for a campaign based on the platform the clicks originated. Click here to learn more about the By Platform report.
Displays the data for a campaign based on the state the clicks originated. Click here to learn more about the By States report.
View stats for your Gemini campaign broken down by the Bid Modifier Group. Click here to learn about the Gemini Bid Modifier report.
View stats for your Gemini campaign broken down by gender. Click here to learn about the Gemini By Gender report.
View stats for your Gemini campaign broken down by age. Click here to learn about the Gemini By Age report.
The Campaign Log shows all changes made by users and Maximus as well. Use this report along with drag to group, search and sort to get the most out of it!